Post by Whiterook on Aug 17, 2022 17:42:30 GMT -5
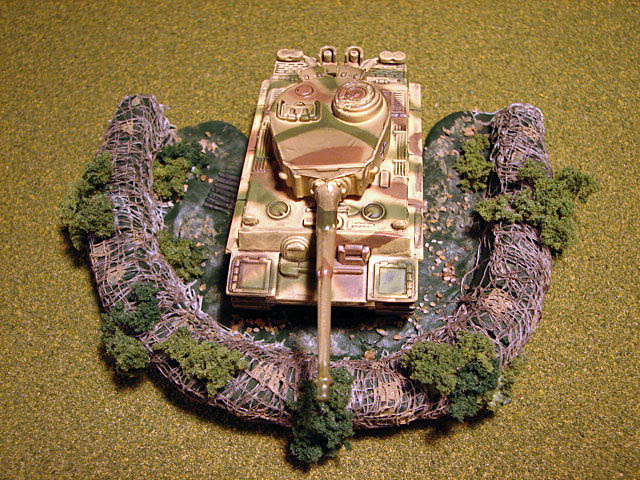
Many years ago, I created a static tank entrenchment for an Axis & Allie’s Miniatures game called, “Oil for Panzers”. I needed an entrenchment to place a guarding armor piece by a critical roadblock into American lines, and I wanted something a little suggestive of that, without getting bogged down in a true rendition… mainly, due to time to create.
I decided to use something simple, rather than casting molds in home made jigs, and that something simple was “Sculpey”

Sculpey is basically an Oven Bake Clay, which when, as you guessed it, bales in the oven, hardens to a very hard rubber-like shape, with no noticeable shrinkage. I used an old baking sheet I whined to my wife for, which worked very well as I recall… I just placed it on the non stick sheet and it worked without having to prep the surface. I do remember it had a strange smell to it while it bakes… nothing toxic, but my wife was like, “What the hell are you doing now?!?”.
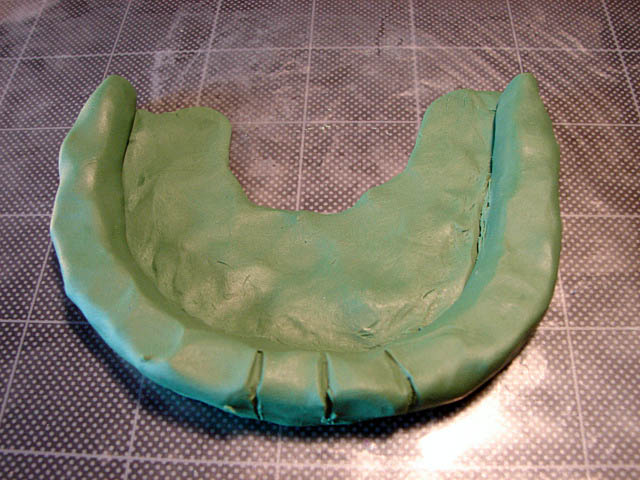
I rolled out a thick rope of clay and pulled the ends to form a thinner diameter to almost a dull point, and then formed a crescent shape. Then, I used my thumbs and fingers to press out very crude “sandbags” bumps. This was followed by using simple clay shaping tools bought at Michael’s Craft Store (where I got the Sculpey) to start carving out and delineation of individual sandbag shapes.
It was at this stage that I also created a rough “ground” plate, on which the tank would sit with a slight raise to the front gun. The “sandbags” crescent was pressed onto the ground plate and then the seams created by both objects was smoothed to join them together smoothly.

These sandbags were to be covered with netting and shrubbery so, I just needed the basic look and outline

Note that I used one of my 15mm Flames of War tanks, with their superior white metal tracks, to imprint tank tracks in the ground

Once everything looked the way I wanted, it was popped in the oven and baked according to the instructions on the package!
I decided to use something simple, rather than casting molds in home made jigs, and that something simple was “Sculpey”

Sculpey is basically an Oven Bake Clay, which when, as you guessed it, bales in the oven, hardens to a very hard rubber-like shape, with no noticeable shrinkage. I used an old baking sheet I whined to my wife for, which worked very well as I recall… I just placed it on the non stick sheet and it worked without having to prep the surface. I do remember it had a strange smell to it while it bakes… nothing toxic, but my wife was like, “What the hell are you doing now?!?”.
I rolled out a thick rope of clay and pulled the ends to form a thinner diameter to almost a dull point, and then formed a crescent shape. Then, I used my thumbs and fingers to press out very crude “sandbags” bumps. This was followed by using simple clay shaping tools bought at Michael’s Craft Store (where I got the Sculpey) to start carving out and delineation of individual sandbag shapes.
It was at this stage that I also created a rough “ground” plate, on which the tank would sit with a slight raise to the front gun. The “sandbags” crescent was pressed onto the ground plate and then the seams created by both objects was smoothed to join them together smoothly.

These sandbags were to be covered with netting and shrubbery so, I just needed the basic look and outline

Note that I used one of my 15mm Flames of War tanks, with their superior white metal tracks, to imprint tank tracks in the ground

Once everything looked the way I wanted, it was popped in the oven and baked according to the instructions on the package!


